Showing posts with label Performance. Show all posts

Android M Developer Preview & Tools

By Jamal Eason, Product Manager, Android


Today at Google I/O, we announced a developer preview of the next version of Android, the M release. Last year’s developer preview was a first for Android and we received great feedback. We want to continue to give you developers early access to Android so you have time to get your apps ready for the next version of Android. This time with the M Developer Preview, we will provide a clear timeline for testing and feedback plus more updates to the preview build.


Visit the M Developer Preview site for downloads and documentation.


The Android M release: improving the fundamentals


For the M release, we focused on improving the core user experience of Android, from fixing thousands of bugs, to making some big changes to the fundamentals of the platform:


  • Permissions - We are giving users control of app permissions in the M release. Apps can trigger requests for permissions at runtime, in the right context, and users can choose whether to grant the permission. Making permission requests right when they’re needed means users can get up and running in your app faster. Also, users have easy access to manage all their app permissions in settings. On M, as a developer, you should design your app to prompt for permissions in context and account for permissions that don’t get granted. As more devices upgrade to M, app permission behavior will be a critical development flow to test.


  • Runtime App Permissions


  • App links - We are making it even easier to link between apps. Android has always allowed apps to register to natively handle URLs. Now you can add an autoVerify attribute to your app manifest so that users can be linked deep into your native app without any disambiguation prompt. App links, along with App Indexing for Google search, make it easier for users to discover and re-engage with your app.


  • Battery - We’re making Android devices smarter about managing power through a new feature called Doze. With M, Android uses significant motion detection to learn if a device has been left unattended for a while. In this state, Android will exponentially back off background activity, trading off a little bit of app freshness for longer battery life. Consider how this may affect your app; for instance, if you’re building a chat app, you may want to make use of high priority messages to wake your app when the device is dozing.


The Android M release: advancing assistance and payments


We are also delighted to announce a couple of big new features:


  • Now on tap - We are making it even easier for Android users to get assistance with Now on tap -- whenever they need it, wherever they are on their device. For example, if your friend texts you about dinner at a new restaurant, without leaving the app, you can ask Google Now for help. Using just that context, Google can find menus, reviews, help you book a table, navigate there, and deep link you into relevant apps. As a developer, you can implement App Indexing for Google search to let users discover and re-engage with your app through Now on tap.


  • Now on tap


  • Android Pay & Fingerprint - We’ve built on our work with Near Field Communications (NFC) in Gingerbread and Host Card Emulation in Kitkat to develop Android Pay. Android Pay will enable Android users to simply and securely use their Android phone to pay in stores or in thousands of Android Pay partner apps. With M, native fingerprint support enhances Android Pay by allowing users to confirm a purchase with their fingerprint. Moreover, fingerprint on M can be used to unlock devices and make purchases on Google Play. With new APIs in M, it’s easy for you to add fingerprint authorization to your app and have it work consistently across a range of devices and sensors.


These are just a few highlights from the M Developer Preview that we announced today. The M preview will be available for download right after the keynote.


Android Developer Tools


In addition to the developer preview, we are launching new tools to help you in the development of your Android App:


  • Android Studio v1.3 Preview - To help take advantage of the M Developer Preview features, we are releasing a new version of Android Studio. Most notable is a much requested feature from our Android NDK & game developers: code editing and debugging for C/C++ code. Based on JetBrains Clion platform, the Android Studio NDK plugin provides features such as refactoring and code completion for C/C++ code alongside your Java code. Java and C/C++ code support is integrated into one development experience free of charge for Android app developers. Update to Android Studio v1.3 via the Canary channel and let us know what you think.


  • Android Studio 1.3 with Android NDK Support


  • Android Design Support Library - Making Material design apps gets even easier with the new Android Design support library. We have packaged a set a key design components (e.g floating action button, snackbar, navigation view, motion enabled Toolbars) that are backward compatible to API 7 and can be added to your app to create a modern, great looking Android app without building everything from scratch.


  • Google Play Services - Today we also are releasing v7.5 of Google Play services which includes new features ranging from Smart Lock for Passwords, new APIs for Google Cloud Messaging and Google Cast, to Google Maps API on Android Wear devices.


Get Started


The M Developer Preview includes an updated SDK with tools, system images for testing on the official Android emulator, and system images for testing on Nexus 5, Nexus 6, Nexus 9, and Nexus Player devices. We are excited to expand the program and give you more time to ensure your apps support M when it launches this fall. Based on your feedback, we plan to update the M Developer preview system images often during the developer preview program. The sooner we hear from you, the more feedback we can integrate, so let us know!


To get started with the M Developer Preview and prepare your apps for the full release, just follow these steps:


  1. Update to Android Studio v1.3+ Preview

  2. Visit the M Developer Preview site for downloads and documentation.

  3. Explore the new APIs & App Permissions changes

  4. Explore the Android Design Support Library and Google Play Services 7.5 APIs

  5. Get the emulator system images through the SDK Manager or download the Nexus device system images.

  6. Test your app with your supported Nexus device or emulator

  7. Give us feedback


Game Performance: Geometry Instancing

Posted by Shanee Nishry, Games Developer Advocate


Imagine a beautiful virtual forest with countless trees, plants and vegetation, or a stadium with countless people in the crowd cheering. If you are heroic you might like the idea of an epic battle between armies.


Rendering a lot of meshes is desired to create a beautiful scene like a forest, a cheering crowd or an army, but doing so is quite costly and reduces the frame rate. Fortunately this is possible using a simple technique called Geometry Instancing.


Geometry instancing can be used in 2D games for rendering a large number of sprites, or in 3D for things like particles, characters and environment.


The NDK code sample More Teapots demoing the content of this article can be found with the ndk inside the samples folder and in the git repository.


Support and Extensions


Geometry instancing is available from OpenGL ES 3.0 and to OpenGL 2.0 devices which support the GL_NV_draw_instanced or GL_EXT_draw_instanced extensions. More information on how to using the extensions is shown in the More Teapots demo.


Overview


Submitting draw calls causes OpenGL to queue commands to be sent to the GPU, this has an expensive overhead which may affect performance. This overhead grows when changing states such as alpha blending function, active shader, textures and buffers.


Geometry Instancing is a technique that combines multiple draws of the same mesh into a single draw call, resulting in reduced overhead and potentially increased performance. This works even when different transformations are required.


The algorithm


To explain how Geometry Instancing works let’s quickly overview traditional drawing.


Traditional Drawing


To a draw a mesh you’d usually prepare a vertex buffer and an index buffer, bind your shader and buffers, set your uniforms such as a World View Projection matrix and make a draw call.


To draw multiple instances using the same mesh you set new uniform values for the transformations and other data and call draw again. This is repeated for every instance.


Drawing with Geometry Instancing


Geometry Instancing reduces CPU overhead by reducing the sequence described above into a single buffer and draw call.


It works by using an additional buffer which contains custom per-instance data needed by your shader, such as transformations, color, light data.


The first change to your workflow is to create the additional buffer on initialization stage.


To put it into code let’s define an example per-instance data that includes a world view projection matrix and a color:


C++


struct PerInstanceData
{
Mat4x4 WorldViewProj;
Vector4 Color;
};


You also need to the structure to your shader. The easiest way is by creating a Uniform Block with an array:


GLSL


#define MAX_INSTANCES 512

layout(std140) uniform PerInstanceData {
struct
{
mat4 uMVP;
vec4 uColor;
} Data[ MAX_INSTANCES ];
};


Note that uniform blocks have limited sizes. You can find the maximum number of bytes you can use by querying for GL_MAX_UNIFORM_BLOCK_SIZE using glGetIntegerv.


Example:


GLint max_block_size = 0;
glGetIntegerv( GL_MAX_UNIFORM_BLOCK_SIZE, &max_block_size );


Bind the uniform block on the CPU in your program’s initialization stage:


C++


#define MAX_INSTANCES 512
#define BINDING_POINT 1
GLuint shaderProgram; // Compiled shader program

// Bind Uniform Block
GLuint blockIndex = glGetUniformBlockIndex( shaderProgram, "PerInstanceData" );
glUniformBlockBinding( shaderProgram, blockIndex, BINDING_POINT );


And create a corresponding uniform buffer object:


C++


// Create Instance Buffer
GLuint instanceBuffer;

glGenBuffers( 1, &instanceBuffer );
glBindBuffer( GL_UNIFORM_BUFFER, instanceBuffer );
glBindBufferBase( GL_UNIFORM_BUFFER, BINDING_POINT, instanceBuffer );

// Initialize buffer size
glBufferData( GL_UNIFORM_BUFFER, MAX_INSTANCES * sizeof( PerInstanceData ), NULL, GL_DYNAMIC_DRAW );


The next step is to update the instance data every frame to reflect changes to the visible objects you are going to draw. Once you have your new instance buffer you can draw everything with a single call to glDrawElementsInstanced.


You update the instance buffer using glMapBufferRange. This function locks the buffer and retrieves a pointer to the byte data allowing you to copy your per-instance data. Unlock your buffer using glUnmapBuffer when you are done.


Here is a simple example for updating the instance data:


const int NUM_SCENE_OBJECTS = …; // number of objects visible in your scene which share the same mesh

// Bind the buffer
glBindBuffer( GL_UNIFORM_BUFFER, instanceBuffer );

// Retrieve pointer to map the data
PerInstanceData* pBuffer = (PerInstanceData*) glMapBufferRange( GL_UNIFORM_BUFFER, 0,
NUM_SCENE_OBJECTS * sizeof( PerInstanceData ),
GL_MAP_WRITE_BIT | GL_MAP_INVALIDATE_RANGE_BIT );

// Iterate the scene objects
for ( int i = 0; i < NUM_SCENE_OBJECTS; ++i )
{
pBuffer[ i ].WorldViewProj = ... // Copy World View Projection matrix
pBuffer[ i ].Color = … // Copy color
}

glUnmapBuffer( GL_UNIFORM_BUFFER ); // Unmap the buffer


And finally you can draw everything with a single call to glDrawElementsInstanced or glDrawArraysInstanced (depending if you are using an index buffer):


glDrawElementsInstanced( GL_TRIANGLES, NUM_INDICES, GL_UNSIGNED_SHORT, 0,
NUM_SCENE_OBJECTS );


You are almost done! There is just one more step to do. In your shader you need to make use of the new uniform buffer object for your transformations and colors. In your shader main program:


void main()
{

gl_Position = PerInstanceData.Data[ gl_InstanceID ].uMVP * inPosition;
outColor = PerInstanceData.Data[ gl_InstanceID ].uColor;
}


You might have noticed the use gl_InstanceID. This is a predefined OpenGL vertex shader variable that tells your program which instance it is currently drawing. Using this variable your shader can properly iterate the instance data and match the correct transformation and color for every vertex.


That’s it! You are now ready to use Geometry Instancing. If you are drawing the same mesh multiple times in a frame make sure to implement Geometry Instancing in your pipeline! This can greatly reduce overhead and improve performance.


Game Performance: Explicit Uniform Locations

Posted by Shanee Nishry, Games Developer Advocate


Uniforms variables in GLSL are crucial for passing data between the game code on the CPU and the shader program on the graphics card. Unfortunately, up until the availability of OpenGL ES 3.1, using uniforms required some preparation which made the workflow slightly more complicated and wasted time during loading.


Let us examine a simple vertex shader and see how OpenGL ES 3.1 allows us to improve it:


#version 300 es

layout(location = 0) in vec4 vertexPosition;
layout(location = 1) in vec2 vertexUV;

uniform mat4 matWorldViewProjection;

out vec2 outTexCoord;

void main()
{
outTexCoord = vertexUV;
gl_Position = matWorldViewProjection * vertexPosition;
}


Note: You might be familiar with this shader from a previous Game Performance article on Layout Qualifiers. Find it here.


We have a single uniform for our world view projection matrix:


uniform mat4 matWorldViewProjection;


The inefficiency appears when you want to assign the uniform value.


You need to use glUniformMatrix4fv or glUniform4f to set the uniform’s value but you also need the handle for the uniform’s location in the program. To get the handle you must call glGetUniformLocation.


GLuint program; // the shader program
float matWorldViewProject[16]; // 4x4 matrix as float array

GLint handle = glGetUniformLocation( program, “matWorldViewProjection” );
glUniformMatrix4fv( handle, 1, false, matWorldViewProject );


That pattern leads to having to call glGetUniformLocation for each uniform in every shader and keeping the handles or worse, calling glGetUniformLocation every frame.


Warning! Never call glGetUniformLocation every frame! Not only is it bad practice but it is slow and bad for your game’s performance. Always call it during initialization and save it somewhere in your code for use in the render loop.


This process is inefficient, it requires you to do more work and costs precious time and performance.


Also take into consideration that you might have multiple shaders with the same uniforms. It would be much better if your code was deterministic and the shader language allowed you to explicitly set the locations of your uniforms so you don’t need to query and manage access handles. This is now possible with Explicit Uniform Locations.


You can set the location for uniforms directly in the shader’s code. They are declared like this


layout(location = index) uniform type name;


For our example shader it would be:


layout(location = 0) uniform mat4 matWorldViewProjection;


This means you never need to use glGetUniformLocation again, resulting in simpler code, initialization process and saved CPU cycles.


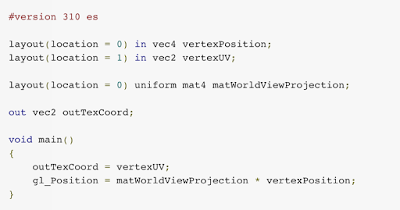
This is how the example shader looks after the change. Changes are marked in bold:


#version 310 es

layout(location = 0) in vec4 vertexPosition;
layout(location = 1) in vec2 vertexUV;

layout(location = 0) uniform mat4 matWorldViewProjection;

out vec2 outTexCoord;

void main()
{
outTexCoord = vertexUV;
gl_Position = matWorldViewProjection * vertexPosition;
}


As Explicit Uniform Locations are only supported from OpenGL ES 3.1 we also changed the version declaration to 310.


Now all you need to do to set your matWorldViewProjection uniform value is call glUniformMatrix4fv for the handle 0:


const GLint UNIFORM_MAT_WVP = 0; // Uniform location for WorldViewProjection
float matWorldViewProject[16]; // 4x4 matrix as float array

glUniformMatrix4fv( UNIFORM_MAT_WVP, 1, false, matWorldViewProject );


This change is extremely simple and the improvements can be substantial, producing cleaner code, asset pipeline and improved performance. Be sure to make these changes If you are targeting OpenGL ES 3.1 or creating multiple APKs to support a wide range of devices.


To learn more about Explicit Uniform Locations check out the OpenGL wiki page for it which contains valuable information on different layouts and how arrays are represented.